Change it UP!
Nightlight: Stage 2
You will need
- 1 x black cable
- 1 x red cable
- 1 x white cable
- 1 x breadboard
- 1 x LDR (light dependent resistor)
- 1 x resistor (400 - 12,000 ohm rating)

1) Unplug the USB cable from your Arduino board.

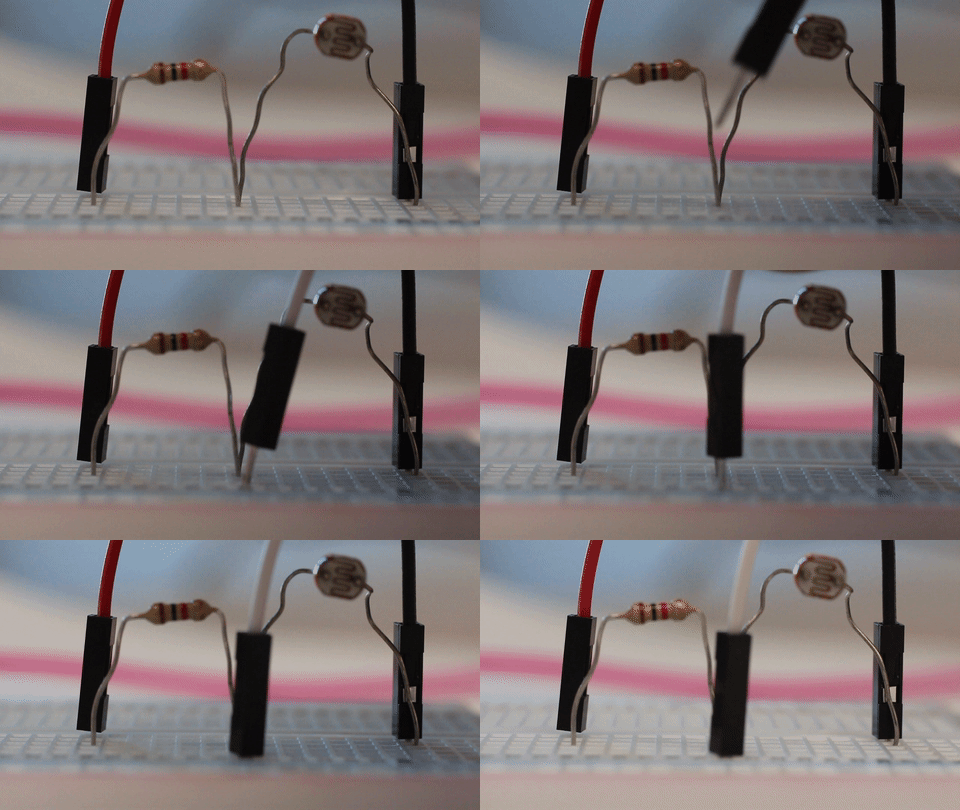
2) Plug the LDR into the breadboard, with the 2 pins on different rows, same as for the LED in Stage 1.

3) Plug in the resistor with one end in the same row as one end of the LDR and the other end in a different row to the other end of the LDR.

4) Plug the white cable into the breadboard on the same row as where the LDR and the resistor are plugged into. Plug the other end into a pin in the “Analog In” section of Arduino board. These are specified by the names A0-A5 (remember the value of the pin you’ve used).

5) Find the end of the LDR which is not plugged into the same row as the white cable. Plug one end of the black cable into that row. Plug the other end of the black cable into the pin labelled GND (ground) on the side of the Arduino board labelled “Power.”

6) Find the end of the resistor which is not plugged into the same row as the white cable. Plug one end of the black cable into that row. Plug the other end of the red cable into the pin labelled 5V on the arduino board.
7) Check that your Arduino board and breadboards look like the picture above.
8) Plug your Arduino board back into your computer using the mini-USB cable. The light should turn on because it’s still running the program you gave it earlier.
9) Now we’ll set the program up to tell us how much light the LDR is measuring. We will setup the Arduino board to record the light coming in from the LDR (input) and display these on the screen.
10) Go back to the Arduino software. Open the nightlight.ino file you were using before and delete the text in the window. Copy and paste the following text (code) into your Arduino software:
int LED_Pin = 3; //change to the pin your LED is connected to
int LDR_Pin = A1; //change to the pin your LDR is connected to
int light_reading;

void setup() {
    pinMode(LED_Pin, OUTPUT);
    pinMode(LDR_Pin, INPUT);
    Serial.begin(9600);
}

void loop() {
    light_reading = analogRead(LDR_Pin);
    Serial.println(light_reading); //displays light reading value
    delay(500);
}
11) Change the LED_Pin = __ to the correct number of the pin you plugged your red cable into on the Arduino board (ie. change the ‘3’ to the correct value for your Arduino board). Change the LDR_Pin = __ to the correct number of the pin you plugged your white cable into on the Arduino board. (ie. change the ‘A1’ to the correct value for your Arduino board).
12) Now, go Sketch > Verify/Compile to compile the code and File > Save and save it as “nightlight.ino”. Next go Sketch > Upload to send it to your Arduino board. Once this has been completed, and program should show “Done uploading.”
13) Open the Serial Monitor window (Tools > Serial Monitor) to view the light reading value. Numbers should be scrolling down the window that pops up. This is the light reading coming from the LDR to your computer via the Arduino board. Write down what the number is when the LDR as it is now - sitting in front of you. The number will vary by about 5 each time, so you don’t need to be accurate. Test that covering the LDR with your hand makes the values change. Taking your hand away the numbers should go back to where they were before.
14) If the numbers go up when your hand covers the LDR, swap over the two cables which you have plugged into the "GND" and the "5V" pins in the Arduino Board. Upload your code to the Arduino Board again and test that the number goes down when you cover it with your hand.
Not Working? Try This!
If you don’t get any numbers scrolling, or only get ‘0’ showing, please follow these steps to find out why:
- Check your code.
- Does it compile? If not check the brackets, extra letters etc that are out of place.
- Is it identifying the correct LED_Pin and LDR_Pin numbers?
- Check the connections on the breadboard.
- Check your breadboard looks like the picture at the end of step 7. If it does and your light is still not working, check that:
- All the pins are pushed in.
- Try using a different LDR.
- Try using different red, black and white cables.
- If none of that gets your light working, ask your teacher/demonstrator for assistance.
